Spreadsheet and Delimited Text Formats |
Spreadsheets and comma, tab, or space delimited text files are popular tools for data storage, and many commercial database vendors allow users to download data in these formats. RATS supports several formats associated with such programs, with these choices for the FORMAT option on DATA and COPY:
|
FORMAT Option |
File Type |
|
Microsoft Excel 2007 and later XLSX spreadsheets |
|
|
Microsoft Excel (2003 and earlier) XLS spreadsheets |
|
|
Lotus 123 worksheets (WK3, WKS, WK1, WRK and WR1 files) |
|
|
Print Files (text files with a spreadsheet–style layout) |
|
|
CSV |
Comma–separated text files |
|
TDF |
Tab and space delimited text |
|
Data Interchange Format |
XLS/XLSX are typically the best choices from among these.
RATS supports these formats in several ways:
•You can read data from a file using the Data/Graphics>Data Wizard (Other Formats) operation, the instruction DATA, or by importing into a Series Window.
•You can write data to a file using the instruction COPY or by exporting from the Series Window.
•You can convert data from a spreadsheet directly to a RATS format file using the CONVERT option of STORE or by importing into a RATS Data File Window.
•You can read and write matrices using READ and WRITE.
•You can export data from Report Windows using the export operations.
All of these can be treated either as Labeled Tables or as Unlabeled Data, depending upon the form that the information takes. To be handled as a Labeled Table, it’s necessary for the data to look something like this sample:
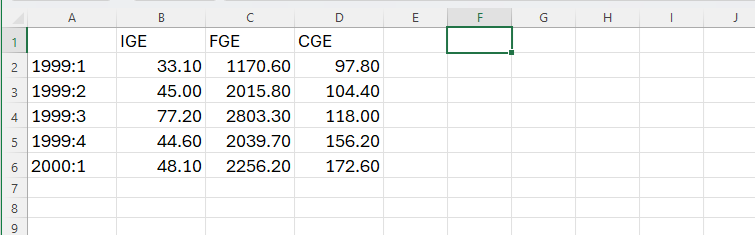
We refer to this as organization by column (series arranged in columns, one observation per row).
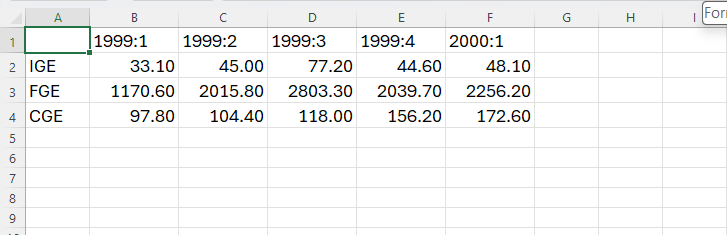
The series can also run across the rows: dates (if present) in the first row and each row of data beginning with the series label in column A. This is organization by row or variable:
In either case, the block of data should be in the upper left hand corner of the worksheet (although options like TOP and LEFT can be used to ignore data above and to the left of the data block).
A third organization is for use when a single series is itself a block of rows and columns. That’s ORG=MULTILINE. With that, you can only read a single series at a time, with the TOP, LEFT, BOTTOM and RIGHT options used to isolate the data.
Dates
The column (or row) of dates is optional. Dates permit more flexible use of the data. If your file includes dates, the date information must appear in the first column or row of the data block. You can enter the dates as strings or as functions or values. If you do enter them as functions or values, be sure to format the cells with a date format.
If you use strings, the dates must be have some type of delimiter between the year and period, or year, month and day; for instance, 1999:1, 1999Q1 or 1999-3-31 are acceptable, 199901 isn’t. If the dates aren’t “yearDperiod” or “yearDmonthDday” (“D” being some non-numeric delimiter), you need to use the DATEFORM option on DATA to provide the form being used. For instance, if you’re using the notation qq-yyyy (01-1999, 02-1999, etc.), include the option DATEFORM="qq-yyyy". The Data Wizard will generally be able to properly detect any such non-standard coding for the dates.
With annual data, you can use just the year number in the data file (2010 rather than 2010:1), but RATS will only recognize this as a date if it is entered as a string rather than a numeric value. Remember that in your RATS programs themselves, you must include the “:1” for annual date references.
Labels
The labels at the beginning of each series are not optional if you want to treat the file as a Labeled Table. RATS uses the series labels to determine which series to read from the file. Labels should normally appear in row 1 (if organized by columns) or column A (if organized by rows). If you have additional rows of header information before the row of series labels (on data arranged by column), you can use “Header Rows before Dates/Labels” field in the Data Wizard or the TOP option directly on DATA to skip those.
Variable names must start with a letter or %, consist of letters, digits, _ , $ or %, and be sixteen characters or less in length (they can actually be longer, but only the first sixteen are significant). If you don’t have the option of changing the names (for instance, it's a file which comes off a web site), you can either use a redirection on DATA or skip the automatic label processing. For instance, suppose the first sample file above had labels of “Investment (GE)”, “Value (GE)” and “Capital (GE)”. Neither the spaces nor the parentheses are permitted in a RATS variable name. To redirect, use fields myseriesname<<"fileseriesname":
open data sample.xls
cal(q) 1999:1
data(format=xls,org=col) 1999:1 2001:1 $
ige<<"Investment (GE)" fge<<"Value (GE)" cge<<"Capital (GE)"
To skip label processing, use the option NOLABELS on DATA, combined with the TOP option to skip the line(s) with the (unusable) labels. So we could read this with:
open data sample.xls
cal(q) 1999:1
data(format=xls,org=col,nolabels,top=2) 1999:1 2001:1 ige fge cge
Since we skipped the label processing, we have to provide our own labels for the series, and we have to read all the series from the file.
Reading Data
You can read data from a spreadsheet or delimited text file using the Data/Graphics>Data (Other Formats) Wizard or by typing in a DATA instruction with the appropriate FORMAT and ORG options. For multi-sheet workbooks, you can use the SHEET option to tell RATS which worksheet you want to read. By default, it will read data from the first worksheet on the workbook’s list of sheets.
To use the Wizard, select Data/Graphics>Data (Other Formats), choose the format of the file you want to read (such as “Excel 2007 Files (*.XLSX)”) from the drop-down list in the dialog box, select the file you want to read, and then use the Wizard dialog box to read the file. If the source file has more than one worksheet, this has a popup box to allow you to select the worksheet you want.
If you are typing the instructions manually, use CALENDAR or the Calendar operation to set the frequency and start date (if using dated data), then use OPEN DATA to specify the file to be read, followed by a DATA instruction with the appropriate options. You can list the specific series you want to read on the DATA instruction, or omit the list and let RATS read all the series on the file.
Whether you can select specific observations out of the file depends in part on whether or not the file includes a date column:
•If there is no date column or row on the file, RATS assumes the first observation on the file corresponds to the first observation you request on DATA. You can ask only for entries at the beginning of the file, never a block in the middle or end. If you need to be able to read in a subset of the data, you could first convert the file to RATS format.
•If there are dates on the file, and the frequency on the file matches the current CALENDAR seasonal, DATA will locate the entries requested and fill in any skipped dates with missing values.
•If the frequency of the current CALENDAR does not match the frequency of the data on the file, RATS will compact or expand the data as it reads it in. See "Changing Data Frequencies".
•If you don’t use a CALENDAR instruction, RATS will read observations from the beginning of the file. Any dates on the file are ignored.
Examples
Make sure that you use the proper extension (XLSX, XLS, or PRN for example) on the file name. RATS will not add it automatically.
This reads series CGE and FGE, for the dates 1999:1 through 1999:4, from the sample worksheet earlier in this section.
cal(q) 1999:1
open data sample.xls
data(format=xls,org=col) 1999:1 1999:4 cge fge
and this reads all the series on the sample file. Because there are no data for 2000:2 and 2000:3, those entries are filled with NA.
cal(q) 1999:1
open data sample.xls
data(format=xls,org=col) 1999:1 2000:3
This reads data from an Excel 2007 XLSX file, summing the daily data on the file to create monthly data in working memory.
cal(m) 2002:1
open data daysales.xlsx
data(format=xlsx,org=col,compact=sum) 2002:1 2009:12
This reads data from an Excel workbook containing several spreadsheet pages. Here, we are reading from the sheet entitled “Quarterly”. The VERBOSE option produces information about the data file, including the frequency and starting date. It will also indicate if any frequency conversion is being performed to match the CALENDAR frequency.
cal(q) 1950:1
open data sales.xls
data(format=xls,org=col,sheet="quarterly",verbose) 1950:1 2006:4
Consider the following. It has three years of quarterly data for two firms. This could be in any of the spreadsheet formats.
FIRM A
2007 11.3 11.6 10.9 12.3
2008 13.0 12.8 11.5 12.5
2009 12.9 13.0 13.2 13.6
FIRM B
2007 22.5 21.9 24.3 25.6
2008 21.9 21.8 22.6 23.5
2009 22.5 25.0 24.5 25.4
We can’t easily convert this to a Labeled Table because the data for a single series span multiple rows. One approach (probably the simplest in this case) is to eliminate the “FIRM A” and “FIRM B” lines and delete the “2007”, “2008”, and “2009”. If this is in a spreadsheet, you could just delete the first column, and save what’s left as text, and read it as free-format with
cal(q) 2007
open data firms.txt
data(format=free,org=rows) 2007:1 2009:4 firma firmb
An alternative is to use a set of options on DATA to isolate just the information that we need. All the spreadsheet formats have a third choice for the ORG option, which is ORG=MULTILINE. This is for precisely this type of situation, where a data series covers several lines. In order to use this, however, we need to know (in advance) exactly how many data points there are in each series, since the limit on a series isn’t defined by the end of the data file. The data for the first series starts at column 2 of row 2 and has twelve data points while the second starts at column 2 of row 7. We have to read each series separately with something like:
open data firms.xls
cal(q) 2007
all 2009:4
data(format=xls,left=2,top=2,nolabels,org=multi) / firma
data(format=xls,left=2,top=7,nolabels,org=multi) / firmb
Both the date scheme (quarterly 2007:1) and end date (2009:4 or twelve entries) need to come from us since those won’t be recognized from the file.
Writing Data
There are several ways to write data to a spreadsheet file. The most common is to use the COPY command to write data series. Begin by opening a file for output with OPEN COPY. Then use COPY to write the data to the file. We recommend that you use the ORG=COL option. You can include dates on the file with the DATES option. Do a CLOSE COPY command if you want to be able to open the file in another application right away. For spreadsheets, this creates a new file (overwriting any existing file of the same name), so you must write the entire file using a single COPY instruction—you cannot use multiple COPY commands to append data to existing spreadsheets.
You can also write series to a spreadsheet by opening the Series List Window using View>Series Window, selecting the series you want to export, and doing File>Export.
open copy sample.xls
copy(format=xls,org=col,dates) 1999:1 2000:1 ige fge cge
produces the sample worksheet from earlier in the section.
One way to add dates to a spreadsheet file which doesn’t have them is to read the data into RATS, set the desired CALENDAR, and write the data back to a new file. If you do that with COPY, use the DATES option; if you export it, make sure you check the “Label Observations with Dates” box.
If you prefer to add dates directly to a spreadsheet, here’s an easy way to add monthly or quarterly date labels to a spreadsheet file. First, create a blank column (or row if the data are organized that way) and format it as one of the built-in date formats. Next, enter the date number corresponding to your first date in cell A2 (or B1 for ORG=ROWS) using the appropriate date function. In Excel, for example, you could enter the date June 1, 1999 with the formula:
=date(1999,6,1)
To fill the rest of the date column or row with monthly dates, enter the following formula in cell A3 (or C1):
=date(year(a2+31),month(a2+31),1)
If ORG=ROWS, use +b1+31 in the formulas, rather than +a2+31.
Finally, copy this formula to the rest of the cells in the date column or row. For quarterly dates, just use +92 in place of +31.
Copyright © 2026 Thomas A. Doan